This page may contain affiliate links. If you purchase through these links, I may earn a commission at no extra cost to you.
Visión general de Crear Studio Pro
Introducción a la Crear Studio Pro
Let’s jump into the world of Crear Studio Pro! This powerful video creation software empowers users to easily craft stunning, high-quality animations and videos without requiring any technical expertise. With features like a point-and-click interface and ready-made templates, anyone can become an animation pro. It’s all about building engaging visual content, and I can’t tell you how much this has transformed my personal projects and client outreach!
History and Evolution of Crear Studio Pro
Crear Studio Pro debuted with the mission to simplify video creation. Over the years, it has undergone significant enhancements, including:
- Launching New Features: Introducing a character creator, automatic sync for voiceovers, and advanced animation tools.
- Comentarios de la Comunidad: Listening to user experiences that shaped upgrades, enhancing usability and performance.
- Incorporating A.I.: New A.I. tools now help generate content like explainer videos in just minutes!
This journey reflects a commitment to evolving alongside the needs of creators, ensuring that every release is better than the last!
Primeros pasos con Crear Studio Pro
Configuración Crear Studio Pro
Primeros pasos con Crear Studio Pro is a breeze! After downloading and installing the software on your device (it’s compatible with both Windows and Mac), you’ll find user-friendly prompts guiding you through the setup.
- Create an account or log in.
- Explore the intuitive dashboard that greets you after setup.
I recall how quickly I got my first project running—I felt like a pro in no time!
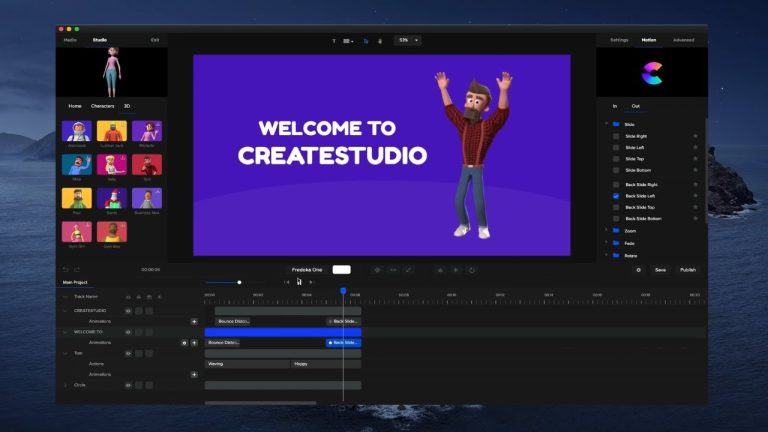
User Interface and Navigation
Once inside, navigating the interface feels natural. The layout is clean and organized into clear sections, making it easy to find tools for:
- Creating animations
- Adding effects
- Importing assets
Key features are just a click away, allowing you to focus on creativity without unnecessary distractions. Trust me, you’ll love how quickly you can produce stunning videos!
Basic Features and Functions
Creating Simple Animations
One of the most exciting aspects of Crear Studio Pro is how effortlessly you can create animations. With its intuitive interface, you can just drag and drop elements into your workspace. Imagine this: you want to create a fun character animation for your social media. You simply choose a character, add some actions, and voilà! You have a captivating animation ready in minutes.
- Use preset motions to speed up your creative process.
- Set keyframes with a click to make those animations come alive.
Adding Text, Images, and Effects
What’s cool about Crear Studio Pro is the flexibility it offers in enhancing your animations. Adding text or images is as simple as a few clicks, allowing you to customize your projects fully. Whether you’re adding:
- Captivating headlines
- Brand logos
- Eye-catching effects
I’ve often found that the incredible array of effects available makes a tremendous difference in grabbing attention. Just pop those elements into the scene, adjust them to fit your style, and you’re ready to impress your audience!
Advanced Tools and Techniques
Working with Keyframes
Once you feel comfortable with the basics, it’s time to delve into the world of keyframes! In Crear Studio Pro, keyframes allow you to control your animations with precision. I remember the first time I used them; it transformed my projects entirely. With just a few clicks, you can:
- Set keyframes for position, scale, and rotation.
- Create smooth, dynamic movements for your characters.
Whether it’s making a character onda or swooping in to deliver a message, keyframes breathe life into your animations!
Using Audio and Video Integration
Once your visuals are set, let’s talk about the sound. The audio integration feature in Crear Studio Pro is a game-changer. You can easily:
- Import your voiceovers and sync them with character lip movements using the automatic lipsyncing feature.
- Add background music and sound effects.
Remember, sound is just as vital as visuals in storytelling. My first animated video became much more engaging when I finally figured out the perfect audio mix! With these tools, your projects can truly shine.
Enhancing Projects with Templates and Effects
Exploring Ready-Made Templates
Una de las características más destacadas de Crear Studio Pro is its extensive library of plantillas listas para usar. These templates serve as a fantastic starting point for any project. When I first discovered them, my production speed increased dramatically! You can find templates for:
- Anuncios en redes sociales
- Explainer Videos
- Contenido promocional
Just select a template, customize the elements, and you’re set. It’s incredibly satisfying to watch a fully-fledged video come together so quickly!
Applying Effects and Transitions
Once your project has a solid base, let’s jazz it up with some effects and transitions. Create Studio offers a myriad of options that can transform your videos. You can:
- Utilice drag and drop effects to enhance visuals.
- Employ one-click transitions for smooth scene changes.
My favorite is the “explosion” effect—it never fails to grab attention! These enhancements really elevate your videos, making them stand out and look professional.
Collaboration and Exporting
Collaborating with Team Members
When working on video projects, colaboración is key, and Crear Studio Pro makes it seamless! You can easily share your projects with team members, allowing for real-time feedback and edits. I love that I can invite collaborators to review my work or contribute their ideas. Some handy features include:
- Commenting directly on the project for quick communication.
- Version control to keep track of changes made by different team members.
This has greatly improved my workflow, helping me stay organized and creative!
Exporting Projects in Different Formats
Once your masterpiece is ready, the exporting options are fantastic! With just a few clicks, you can export your projects in various formats:
- MP4 for social media
- GIFs for quick sharing
- High-resolution files for presentations
I remember the excitement of sharing my first completed project online—exporting felt like the final cherry on top! Whether for personal use or professional presentations, you’ll find the perfect format tailored to your audience.
Tips and Tricks for Efficiency
Keyboard Shortcuts and Time-Saving Techniques
Once you’re comfortable with Crear Studio Pro, mastering keyboard shortcuts can truly enhance your efficiency. I remember when I first discovered these shortcuts; my editing speed doubled! Here are some game-changers:
- Ctrl + Z for undoing mistakes.
- Ctrl + C y Ctrl + V for quick copy-pasting.
- N to create new scenes effortlessly.
Implementing these can save you tons of time while working on your projects!
Performance Optimization and Workflow Tips
To keep your workflow smooth, remember to:
- Organize assets into folders for easy access.
- Preview animations regularly to catch issues early.
I’ve found that working in smaller sections of a project not only keeps me organized but also maintains high performance. Following these tips will dramatically improve your experience with Create Studio!
Solución de problemas y asistencia
Common Issues and Solutions
Even with such a powerful tool like Crear Studio Pro, you might run into a few hiccups along the way. Don’t worry; I’ve been there! Here are some common issues and their solutions:
- Lagging Performance: This can sometimes occur if your system is low on resources. Try closing other applications or upgrading your hardware.
- Audio Sync Issues: If your audio isn’t syncing, ensure that the voiceover files are properly formatted. Converting them to a compatible format often fixes the issue.
These solutions have saved me hours of frustration!
Accessing Help Resources
When you need extra assistance, Crear Studio Pro offers a wealth of resources:
- Tutorial Videos: Perfect for visual learners wanting to master features.
- User Forums: Connect with other users for troubleshooting advice.
- Atención al cliente: Reach out for dedicated help for any persisting challenges.
These resources are incredibly helpful and have guided me through many projects, ensuring I get the most from the software!
Mastering Crear Studio Pro
Advanced Animation Techniques
To truly stand out, mastering advanced animation techniques en Crear Studio Pro is essential. Utilize features like keyframes y motion easing to create dynamic, fluid movements. I find that layering animations with different speeds adds depth to my projects.
- Experiment with preset motions for quick results.
- Combine custom text animations for impactful storytelling.
These techniques can seriously elevate the quality of your videos!
Customization and Branding Options
Cuando se trata de personalización, the sky’s the limit! Crear Studio Pro allows you to easily integrate your brand elements:
- Add your logo to characters or scenes for professional touch.
- Customize color palettes and fonts to match your brand identity.
I remember how personalizing my videos helped boost client engagement tremendously. With these options, you can create content that not only looks great but also strengthens your branding!